반응형
[Flutter] 플러터 기초 (7) - 레이아웃 예제(Layout tutorial)
Flutter 플러터 기초 (7) - 레이아웃 예제(Layout tutorial)
이모티콘・01・고양이 마멋 친구들 - Google Play 앱
이모티콘・01・고양이 마멋 친구들: 무료 이모티콘, 회원가입 없이! 카톡, SNS로 감정 표현이 쉬워져요. 귀여움 가득, 대화창을 더 풍성하게!
play.google.com
안녕하세요 정보처리마법사 입니다.
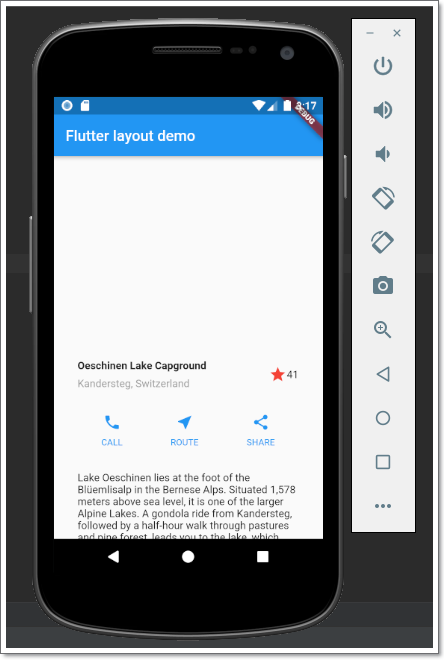
이번 포스팅의 주제는 레이아웃에 관한 내용입니다.


|
1
2
3
4
5
6
7
8
9
10
11
12
13
14
15
16
17
18
19
20
21
22
23
24
25
26
27
28
29
30
31
32
33
34
35
36
37
38
39
40
41
42
43
44
45
46
47
48
49
50
51
52
53
54
55
56
57
58
59
60
61
62
63
64
65
66
67
68
69
70
71
72
73
74
75
76
77
78
79
80
81
82
83
84
85
86
87
88
89
90
91
92
93
94
95
96
97
98
99
100
101
102
103
104
105
106
107
108
109
110
111
|
import 'package:flutter/material.dart';
void main(){
runApp(MyApp());
}
class MyApp extends StatelessWidget {
@override
Widget build(BuildContext context) {
Widget titleSection=Container(
padding: const EdgeInsets.all(32),
child: Row(
children: <Widget>[
Expanded(
child: Column(
crossAxisAlignment: CrossAxisAlignment.start,
children: <Widget>[
Container(
padding: const EdgeInsets.only(bottom: 8),
child: Text(
'Oeschinen Lake Capground',
style: TextStyle(
fontWeight: FontWeight.bold,
),
),
),
Text(
'Kandersteg, Switzerland',
style: TextStyle(
color: Colors.grey[500],
),
),
],
),
),
Icon(Icons.star,
color: Colors.red[500],
),
Text('41'),
],
),
);
Color color=Theme.of(context).primaryColor;
Widget buttonSection=Container(
child: Row(
mainAxisAlignment: MainAxisAlignment.spaceEvenly,
children: <Widget>[
_buildButtonColumn(color, Icons.call, 'CALL'),
_buildButtonColumn(color, Icons.near_me, 'ROUTE'),
_buildButtonColumn(color, Icons.share, 'SHARE'),
],
),
);
Widget textSection=Container(
padding: const EdgeInsets.all(32),
child: Text(
'Lake Oeschinen lies at the foot of the Blüemlisalp in the Bernese '
'Alps. Situated 1,578 meters above sea level, it is one of the '
'larger Alpine Lakes. A gondola ride from Kandersteg, followed by a '
'half-hour walk through pastures and pine forest, leads you to the '
'lake, which warms to 20 degrees Celsius in the summer. Activities '
'enjoyed here include rowing, and riding the summer toboggan run.',
softWrap: true,
),
);
return MaterialApp(
title: 'Flutter layout demo',
home: Scaffold(
appBar: AppBar(
title: Text('Flutter layout demo'),
),
body: ListView(
children: <Widget>[
Image.asset('images/lake.jpg',
width: 600,
height: 240,
fit: BoxFit.cover,
),
titleSection,
buttonSection,
textSection,
],
),
),
);
}
Column _buildButtonColumn(Color color, IconData icon, String label){
return Column(
mainAxisSize: MainAxisSize.min,
mainAxisAlignment: MainAxisAlignment.center,
children: <Widget>[
Icon(icon, color: color),
Container(
margin: const EdgeInsets.only(top: 8),
child: Text(
label,style: TextStyle(
fontSize: 12,
fontWeight: FontWeight.w400,
color: color,
),
),
),
],
);
}
}
http://colorscripter.com/info#e" target="_blank" style="color:#4f4f4ftext-decoration:none">Colored by Color Scripter
|
http://colorscripter.com/info#e" target="_blank" style="text-decoration:none;color:white">cs |
Ctrl + C , Ctrl + V
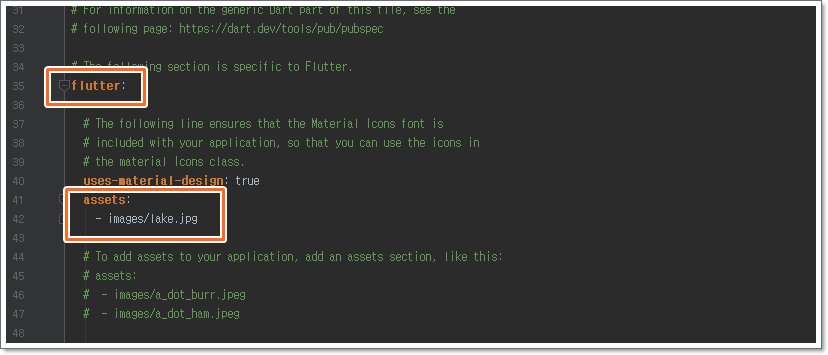
아무 이미지를 사용하셔도 되고 아래 출처에 가보시면 lake.jpg 이미지 있습니다.
출처 : https://flutter.dev/docs/development/ui/layout/tutorial
이상으로 포스팅을 마칩니다. 감사합니다.
잘 못 된 정보가 있으면 말씀해주세요.
공감버튼 클릭은 작성자에게 큰 힘이 됩니다. 행복한 하루 되세요.

“파트너스 활동을 통해 일정액의 수수료를 제공받을 수 있음"
반응형
'Flutter' 카테고리의 다른 글
| [Flutter] 플러터 - 갑자기 빌드가 안될때 Flutter upgrade (0) | 2019.07.16 |
|---|---|
| [Flutter] 플러터 기초 (10) - 슬리버 예제(Sliver Tutorial) (0) | 2019.07.12 |
| [Flutter] 플러터 기초 (6) - 리스트뷰 위젯(ListView Widget) 예제. (0) | 2019.07.10 |
| [Flutter] 플러터 기초 (5) - cupertino ui button, material ui button (0) | 2019.06.28 |
| [Flutter] 플러터 기초 (4) - Hello World, FloatingActionButton 등 기본 예제. (0) | 2019.06.28 |

